1、LinkedHashMap 简介 HashMap 是 无序 的,HashMap 在 put 的时候是根据 key 的 hashcode 进行 hash 然后放入对应的位置。所以在按照一定顺序 put 进 HashMap 中后,再次遍历出 HashMap 的顺序跟 put 的顺序不同(除非在 put 的时候 key 已经按照 hashcode 排好序了)。
JAVA 在 JDK1.4 以后提供了 LinkedHashMap 来帮助我们实现了有序的 HashMap。
LinkedHashMap** 继承自 HashMap,是Map接口的哈希表和链接列表实现,具有 可预知的迭代顺序**。此实现提供所有可选的映射操作,并允许使用 null 值和 null 键。
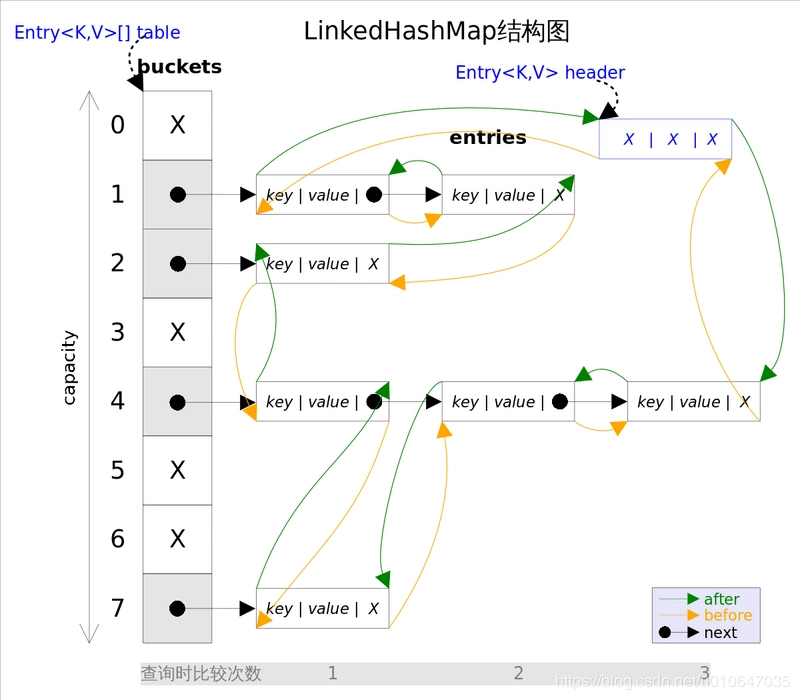
LinkedHashMap 实现与 HashMap 的不同之处在于,LinkedHashMap 在 HashMap 基础上,维护了一条双向链表 。此链接列表定义了迭代顺序,该迭代顺序可以是插入顺序或者是访问顺序。
除此之外,LinkedHashMap 对访问顺序也提供了相关支持。在一些场景下,该特性很有用,比如缓存 。
注意 ,此实现不是同步 的。如果多个线程同时访问链接的哈希映射,而其中至少一个线程从结构上修改了该映射,则它必须保持外部同步。
根据链表中元素的顺序可以分为:按插入顺序的链表,和按访问顺序(调用 get 方法)的链表。默认是按插入顺序排序,如果指定按访问顺序排序,那么调用get方法后,会将这次访问的元素移至链表尾部,不断访问可以形成按访问顺序排序的链表。
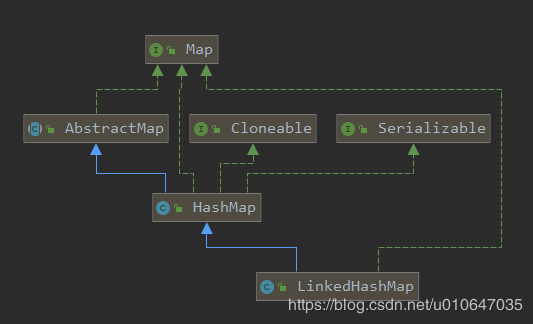
在实现上,LinkedHashMap 它继承自 **HashMap(public class LinkedHashMap<K,V> extends HashMap<K,V> implements Map<K,V>)**、底层使用哈希表与双向链表来保存所有元素。其基本操作与父类 HashMap 相似,它通过重写父类相关的方法,来实现自己的链接列表特性。
所以,在学习 LinkedHashMap 的源码之前,很有必要先看懂 HashMap 的源码。关于 HashMap 的源码分析,大家可以参考笔者之前的一篇文章Java集合框架(十八):HashMap 源码分析
2、LinkedHashMap 数据结构
LinkedHashMap 和 HashMap 的区别在于它们的基本数据结构上,LinkedHashMap 中采用的链表是双向循环链表,也就是Entry,这种数据结构,最关键的是保证在增加节点、删除节点时不断链。
2.1、Entry 的继承体系
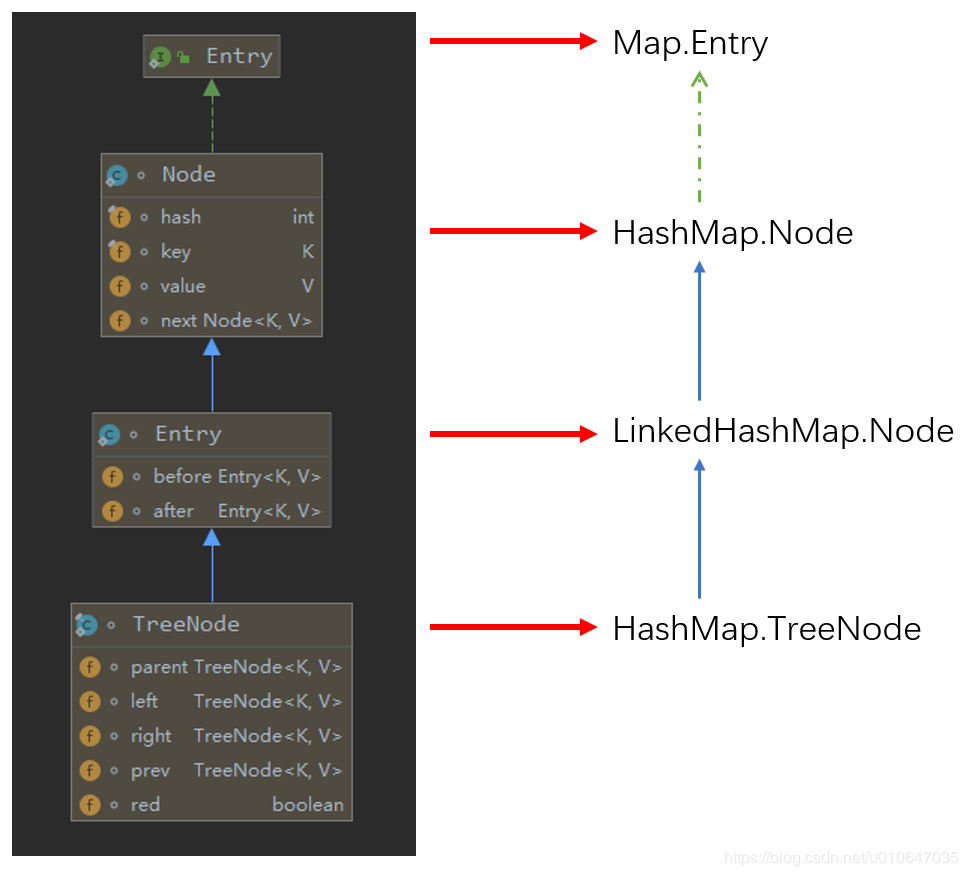
LinkedHashMap 内部类 Entry 继承自 HashMap 内部类 Node,并新增了两个引用,分别是 before 和 after。这两个引用的用途就是用于维护双向链表。
TreeNode 继承 LinkedHashMap 的内部类 Entry 后,就具备了和其他 Entry 一起组成链表的能力。
但是这里需要大家考虑一个问题。当我们使用 HashMap 时,TreeNode 并不需要具备组成链表能力。如果继承 LinkedHashMap 内部类 Entry ,TreeNode 就多了两个用不到的引用,这样做不是会浪费空间吗?
首先这么做确实会浪费空间,但与 TreeNode 通过继承获取的组成链表的能力相比,这点浪费是值得的。在 HashMap 的设计思路注释中,有这样一段话,大致意思如下:
1
2
3
4
5
6
Because TreeNodes are about twice the size of regular nodes, we use them only when bins contain enough nodes to warrant use (see TREEIFY_THRESHOLD) . And when they become too small (due to removal or resizing) they are converted back to plain bins. Inusages with well-distributed user hashCodes, tree bins are rarely used.
TreeNode 对象的大小约是普通 Node 对象的2倍,我们仅在桶(bin)中包含足够多的节点时再使用。当桶中的节点数量变少时(取决于删除和扩容),TreeNode 会被转成 Node。当用户实现的 hashCode 方法具有良好分布性时,树类型的桶将会很少被使用。
一般情况下,只要 hashCode 的实现够合理,Node 组成的链表很少会被转成由 TreeNode 组成的红黑树。也就是说 TreeNode 使用的并不多,浪费那点空间是可接受的。假如 TreeNode 的机制继承自 Node 类,那么它要想具备组成链表的能力,就需要 Node 去继承 LinkedHashMap 的内部类 Entry。这样就得不偿失了,浪费很多空间去获取不一定用得到的能力。
3、LinkedHashMap 源码分析 3.1、LinkedHashMap 类图 1 2 3 public class LinkedHashMap <K,V> extends HashMap <K,V> implements Map <K,V>
3.2、LinkedHashMap 构造函数 LinkedHashMap有5个构造方法,从构造方法中可以看出,默认都采用插入顺序对key进行排序来维持取出键值对的顺序。所有构造方法都是通过调用父类的构造方法来创建对象的。
1 2 3 4 5 6 7 8 9 10 11 12 13 14 15 16 17 18 19 20 21 22 23 24 25 26 27 28 29 30 31 32 33 34 35 36 37 38 39 40 41 42 43 44 45 46 47 48 49 50 51 52 53 54 55 56 57 58 59 60 61 62 63 64 65 final boolean accessOrder; public LinkedHashMap (int initialCapacity, float loadFactor) { super (initialCapacity, loadFactor); accessOrder = false ; } public LinkedHashMap (int initialCapacity) { super (initialCapacity); accessOrder = false ; } public LinkedHashMap () { super (); accessOrder = false ; } public LinkedHashMap (Map<? extends K, ? extends V> m) { super (); accessOrder = false ; putMapEntries(m, false ); } public LinkedHashMap (int initialCapacity, float loadFactor, boolean accessOrder) { super (initialCapacity, loadFactor); this .accessOrder = accessOrder; }
3.3、LinkedHashMap 成员变量 LinkedHashMap 采用的 hash 算法和 HashMap 相同,但是它重新定义了数组中保存的元素 Entry,该 Entry 除了保存当前对象的引用外,还保存了其上一个元素 before 和下一个元素 after 的引用,从而在哈希表的基础上又构成了双向链接列表。
1 2 3 4 5 6 7 8 9 10 11 12 13 14 15 16 transient LinkedHashMap.Entry<K,V> head; transient LinkedHashMap.Entry<K,V> tail; final boolean accessOrder;
4、常用方法源码分析 4.1、containsValue( Object value) 1 2 3 4 5 6 7 8 9 10 11 12 13 14 15 16 public boolean containsValue (Object value) { for (LinkedHashMap.Entry<K,V> e = head; e != null ; e = e.after) { V v = e.value; if (v == value || (value != null && value.equals(v))) return true ; } return false ; }
4.2、get( Object key) 1 2 3 4 5 6 7 8 9 10 11 12 13 public V get (Object key) { Node<K,V> e; if ((e = getNode(hash(key), key)) == null ) return null ; if (accessOrder) afterNodeAccess(e); return e.value; }
4.3、getOrDefault( Object key, V defaultValue) 1 2 3 4 5 6 7 8 9 10 11 public V getOrDefault (Object key, V defaultValue) { Node<K,V> e; if ((e = getNode(hash(key), key)) == null ) return defaultValue; if (accessOrder) afterNodeAccess(e); return e.value; }
4.4、clear() 1 2 3 4 5 6 7 8 9 public void clear () { super .clear(); head = tail = null ; }
4.5、removeEldestEntry( Map.Entry<K,V> eldest) 1 2 3 4 5 6 7 8 9 10 11 12 13 14 15 16 17 18 19 protected boolean removeEldestEntry (Map.Entry<K,V> eldest) { return false ; }
4.6、keySet() 1 2 3 4 5 6 7 8 9 10 11 12 13 14 15 16 17 18 19 20 21 22 23 24 25 26 27 28 29 30 31 32 33 34 35 36 37 38 39 40 41 42 public Set<K> keySet () { Set<K> ks = keySet; if (ks == null ) { ks = new LinkedKeySet (); keySet = ks; } return ks; } final class LinkedKeySet extends AbstractSet <K> { public final int size () { return size; } public final void clear () { LinkedHashMap.this .clear(); } public final Iterator<K> iterator () { return new LinkedKeyIterator (); } public final boolean contains (Object o) { return containsKey(o); } public final boolean remove (Object key) { return removeNode(hash(key), key, null , false , true ) != null ; } public final Spliterator<K> spliterator () { return Spliterators.spliterator(this , Spliterator.SIZED | Spliterator.ORDERED | Spliterator.DISTINCT); } public final void forEach (Consumer<? super K> action) { if (action == null ) throw new NullPointerException (); int mc = modCount; for (LinkedHashMap.Entry<K,V> e = head; e != null ; e = e.after) action.accept(e.key); if (modCount != mc) throw new ConcurrentModificationException (); } }
4.7、values() 1 2 3 4 5 6 7 8 9 10 11 12 13 14 15 16 17 18 19 20 21 22 23 24 25 26 27 28 29 30 31 32 33 34 35 36 37 38 public Collection<V> values () { Collection<V> vs = values; if (vs == null ) { vs = new LinkedValues (); values = vs; } return vs; } final class LinkedValues extends AbstractCollection <V> { public final int size () { return size; } public final void clear () { LinkedHashMap.this .clear(); } public final Iterator<V> iterator () { return new LinkedValueIterator (); } public final boolean contains (Object o) { return containsValue(o); } public final Spliterator<V> spliterator () { return Spliterators.spliterator(this , Spliterator.SIZED | Spliterator.ORDERED); } public final void forEach (Consumer<? super V> action) { if (action == null ) throw new NullPointerException (); int mc = modCount; for (LinkedHashMap.Entry<K,V> e = head; e != null ; e = e.after) action.accept(e.value); if (modCount != mc) throw new ConcurrentModificationException (); } }
4.8、entrySet() 1 2 3 4 5 6 7 8 9 10 11 12 13 14 15 16 17 18 19 20 21 22 23 24 25 26 27 28 29 30 31 32 33 34 35 36 37 38 39 40 41 42 43 44 45 46 47 48 public Set<Map.Entry<K,V>> entrySet() { Set<Map.Entry<K,V>> es; return (es = entrySet) == null ? (entrySet = new LinkedEntrySet ()) : es; } final class LinkedEntrySet extends AbstractSet <Map.Entry<K,V>> { public final int size () { return size; } public final void clear () { LinkedHashMap.this .clear(); } public final Iterator<Map.Entry<K,V>> iterator() { return new LinkedEntryIterator (); } public final boolean contains (Object o) { if (!(o instanceof Map.Entry)) return false ; Map.Entry<?,?> e = (Map.Entry<?,?>) o; Object key = e.getKey(); Node<K,V> candidate = getNode(hash(key), key); return candidate != null && candidate.equals(e); } public final boolean remove (Object o) { if (o instanceof Map.Entry) { Map.Entry<?,?> e = (Map.Entry<?,?>) o; Object key = e.getKey(); Object value = e.getValue(); return removeNode(hash(key), key, value, true , true ) != null ; } return false ; } public final Spliterator<Map.Entry<K,V>> spliterator() { return Spliterators.spliterator(this , Spliterator.SIZED | Spliterator.ORDERED | Spliterator.DISTINCT); } public final void forEach (Consumer<? super Map.Entry<K,V>> action) { if (action == null ) throw new NullPointerException (); int mc = modCount; for (LinkedHashMap.Entry<K,V> e = head; e != null ; e = e.after) action.accept(e); if (modCount != mc) throw new ConcurrentModificationException (); } }
4.9、链表节点的创建 链表的创建过程是在插入键值对节点时开始的,初始情况下,让 LinkedHashMap 的 head 和 tail 引用同时指向新节点,链表就算建立起来了。随后不断有新节点插入,通过将新节点接在 tail 引用指向节点的后面,即可实现链表的更新。
Map 类型的集合类是通过 put(K,V) 方法插入键值对,LinkedHashMap 本身并没有覆写父类的 put 方法,而是直接使用了父类的实现。但在 HashMap 中,put 方法插入的是 HashMap 内部类 Node 类型的节点,该类型的节点并不具备与 LinkedHashMap 内部类 Entry 及其子类型节点组成链表的能力。
在 HashMap 的 putval 方法里面创建新节点是使用 newNode 方法的,自然 LinkedHashMap 只需要重写下 newNode 方法即可。
1 2 3 4 5 6 7 8 9 10 11 12 13 14 15 16 17 18 19 20 21 22 23 24 25 26 27 28 29 30 31 32 33 34 35 36 37 38 39 40 41 42 43 44 45 46 47 48 49 50 51 52 53 54 55 56 57 58 59 60 public V put (K key, V value) { return putVal(hash(key), key, value, false , true ); } final V putVal (int hash, K key, V value, boolean onlyIfAbsent, boolean evict) { Node<K,V>[] tab; Node<K,V> p; int n, i; if ((tab = table) == null || (n = tab.length) == 0 ) {...} if ((p = tab[i = (n - 1 ) & hash]) == null ) {...} else { Node<K,V> e; K k; if (p.hash == hash && ((k = p.key) == key || (key != null && key.equals(k)))) e = p; else if (p instanceof TreeNode) {...} else { for (int binCount = 0 ; ; ++binCount) { if ((e = p.next) == null ) { p.next = newNode(hash, key, value, null ); if (binCount >= TREEIFY_THRESHOLD - 1 ) {...} break ; } if (e.hash == hash && ((k = e.key) == key || (key != null && key.equals(k)))) break ; p = e; } } if (e != null ) { V oldValue = e.value; if (!onlyIfAbsent || oldValue == null ) {...} afterNodeAccess(e); return oldValue; } } ++modCount; if (++size > threshold) {...} afterNodeInsertion(evict); return null ; } Node<K,V> newNode (int hash, K key, V value, Node<K,V> next) { return new Node <>(hash, key, value, next); } Node<K,V> newNode (int hash, K key, V value, Node<K,V> e) { LinkedHashMap.Entry<K,V> p = new LinkedHashMap .Entry<K,V>(hash, key, value, e); linkNodeLast(p); return p; }
链表节点创建,主要分为三步 :
创建 p 节点没什么复杂的操作,和 HashMap 里面的一样,主要的操作在关联节点 linkNodeLast 中:
1 2 3 4 5 6 7 8 9 10 11 12 13 14 15 16 private void linkNodeLast (LinkedHashMapEntry<K,V> p) { LinkedHashMapEntry<K,V> last = tail; tail = p; if (last == null ) head = p; else { p.before = last; last.after = p; } }
可以看到,在 linkNodeLast() 函数的内部给节点的 before 和 after属性赋值,也就把节点给串联了起来。
在 HashMap 的 putVal 方法里面发现了这个方法 afterNodeInsertion:
1 2 3 4 5 6 7 8 9 final V putVal (int hash, K key, V value, boolean onlyIfAbsent, boolean evict) { ++modCount; if (++size > threshold) resize(); afterNodeInsertion(evict); return null ; }
这里的 afterNodeInsertion 在 HashMap 里面是空方法,专门为 LinkedHashMap 准备的,与之类似的还有两个方法:
1 2 3 4 5 6 void afterNodeAccess (Node<K,V> p) { }void afterNodeInsertion (boolean evict) { }void afterNodeRemoval (Node<K,V> p) { }
4.9.1、afterNodeInsertion 方法 1 2 3 4 5 6 7 8 9 10 11 12 13 14 void afterNodeInsertion (boolean evict) { LinkedHashMapEntry<K,V> first; if (evict && (first = head) != null && removeEldestEntry(first)) { K key = first.key; removeNode(hash(key), key, null , false , true ); } } protected boolean removeEldestEntry (Map.Entry<K,V> eldest) { return false ; }
4.10、链表节点的删除 与插入操作一样,LinkedHashMap 删除操作相关的代码也是直接用父类的实现。在删除节点时,父类的删除逻辑并不会修复 LinkedHashMap 所维护的双向链表,这不是它的职责。那么删除节点后,被删除的节点该如何从双链表中移除呢?上文最后提到 HashMap 中三个回调方法运行 LinkedHashMap 对一些操作做出响应。所以,在删除及节点后,回调方法 afterNodeRemoval 会被调用。LinkedHashMap 覆写该方法,并在该方法中完成了移除被删除节点的操作。
1 2 3 4 5 6 7 8 9 10 11 12 13 14 15 16 17 18 19 20 21 22 23 24 25 26 27 28 29 30 31 32 33 34 35 36 37 38 39 40 41 42 43 44 45 46 47 48 public V remove (Object key) { Node<K,V> e; return (e = removeNode(hash(key), key, null , false , true )) == null ? null : e.value; } final Node<K,V> removeNode (int hash, Object key, Object value, boolean matchValue, boolean movable) { Node<K,V>[] tab; Node<K,V> p; int n, index; if ((tab = table) != null && (n = tab.length) > 0 && (p = tab[index = (n - 1 ) & hash]) != null ) { Node<K,V> node = null , e; K k; V v; if (p.hash == hash && ((k = p.key) == key || (key != null && key.equals(k)))) node = p; else if ((e = p.next) != null ) { if (p instanceof TreeNode) {...} else { do { if (e.hash == hash && ((k = e.key) == key || (key != null && key.equals(k)))) { node = e; break ; } p = e; } while ((e = e.next) != null ); } } if (node != null && (!matchValue || (v = node.value) == value || (value != null && value.equals(v)))) { if (node instanceof TreeNode) {...} else if (node == p) tab[index] = node.next; else p.next = node.next; ++modCount; --size; afterNodeRemoval(node); return node; } } return null ; }
4.10.1、afterNodeRemoval 方法 1 2 3 4 5 6 7 8 9 10 11 12 13 14 15 16 17 18 19 20 21 22 void afterNodeRemoval (Node<K,V> e) { LinkedHashMapEntry<K,V> p = (LinkedHashMapEntry<K,V>)e, b = p.before, a = p.after; p.before = p.after = null ; if (b == null ) head = a; else b.after = a; if (a == null ) tail = b; else a.before = b; }
删除的过程并不复杂,主要分为三步 :
🌂根据 hash 定位到桶位置
4.11、获取数据 LinkedHashMap 重写了 get 方法,首先通过 getNode 查找节点,但是在 LinkedHashMap 方法中并没有这个 getNode 方法,是调用的 HashMap 的 getNode 方法。
1 2 3 4 5 6 7 8 9 10 public V get (Object key) { Node<K,V> e; if ((e = getNode(hash(key), key)) == null ) return null ; if (accessOrder) afterNodeAccess(e); return e.value; }
4.11.1、afterNodeAccess 方法 把当前操作的节点移到最后,作为尾节点。
1 2 3 4 5 6 7 8 9 10 11 12 13 14 15 16 17 18 19 20 21 22 23 24 25 26 27 28 29 30 31 32 33 34 35 36 37 void afterNodeAccess (Node<K,V> e) { LinkedHashMapEntry<K,V> last; if (accessOrder && (last = tail) != e) { LinkedHashMapEntry<K,V> p = (LinkedHashMapEntry<K,V>)e, b = p.before, a = p.after; p.after = null ; if (b == null ) head = a; else b.after = a; if (a != null ) a.before = b; else last = b; if (last == null ) head = p; else { p.before = last; last.after = p; } tail = p; ++modCount; } }
4.12、访问顺序的维护(afterNodeAccess 方法) 默认情况下,LinkedHashMap 是按插入顺序维护链表。不过我们可以在初始化 LinkedHashMap,指定 accessOrder 参数为 true,即可让它按访问顺序维护链表。访问顺序的原理并不复杂,当我们调用get/getOrDefault/replace等方法时,只需要将这些方法访问的节点移动到链表的尾部即可。
5、LinkedHashMap 总结 🌂LinkedHashMap 允许key 为 null ,value 为 null
6、怎样利用LinkedHashMap实现LRU缓存? 我们只要把accessOrder设置为true,重写 removeEldestEntry(eldest) 即可。我们在 removeEldestEntry(eldest) 指定 map里面的元素数量超过指定的大小,开始删除最近最少使用的元素,为后续新增的元素准备空间。
1 2 3 4 5 6 7 8 9 10 11 12 13 14 15 16 17 18 19 20 21 22 23 24 25 26 27 28 29 public class LRUCache <K, V> extends LinkedHashMap <K, V> { private static final long serialVersionUID = 1L ; protected int maxElements; public LRUCache (int maxSize) { super (maxSize, 0.75F , true ); this .maxElements = maxSize; } protected boolean removeEldestEntry (Map.Entry<K,V> eldest) { return this .size() > this .maxElements; } public V save (K key, V val) { return put(key, val); } public V getOne (K key) { return get(key); } public boolean exists (K key) { return containsKey(key); } }
示例:
1 2 3 4 5 6 7 8 9 10 11 12 13 14 15 16 17 18 public static void main (String[] args) { LRUCache<Integer, Integer> cache = new LRUCache <>(3 ); for (int i = 0 ; i < 5 ; i++) { cache.save(i, i * i); } System.out.println("插入5个键值对后,缓存内容:" ); System.out.println(cache + "\n" ); System.out.println("访问键值为2的节点后,缓存内容:" ); cache.getOne(7 ); System.out.println(cache + "\n" ); System.out.println("插入键值为8的键值对后,缓存内容:" ); cache.save(8 , 8 ); System.out.println(cache); }
输出:
1 2 3 4 5 6 7 8 插入5 个键值对后,缓存内容: {2 =4 , 3 =9 , 4 =16 } 访问键值为2 的节点后,缓存内容: {2 =4 , 3 =9 , 4 =16 } 插入键值为8 的键值对后,缓存内容: {3 =9 , 4 =16 , 8 =8 }
7、HashMap 与 LinkedHashMap 区别 相同点:
不同点:
不同点
HashMap
LinkedHashMap
数据结构
数组+链表+红黑树
数组+链表+红黑树+双向循环链表
是否有序
无序
有序


